


Thursday, 23 December 2010
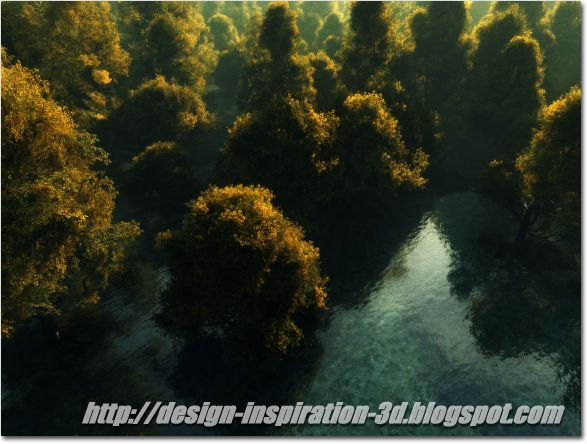
35 Amazing CG Environments
Digital nature became quite easy to create with the newest applications that allow nearly anybody to create advanced and amazing environments with almost no effort. Software like Vue Infinite requires just a few clicks of mouse to achieve quite pleasing results. It is able to generate terrains, atmospheres and entire ecosystems! Nonetheless the best images still require a human factor to become truly amazing and creative.
I’ve prepared a list of 35 great nature images. Most of these images were made using 3D applications but some were painted and one or two are just photos because I though you may be interested in checking them also so they are included in the list.
VITYA
Some works created by VITYA using Photoshop CS4 and Wacom.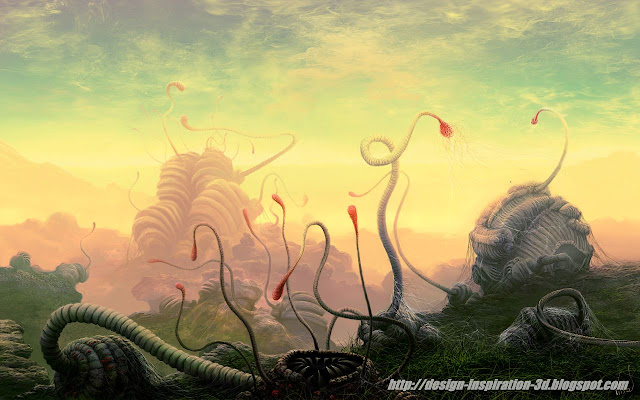

Alex Roman
Software used: 3ds Max, Vray, Adobe After Effects and Photoshop.
Weihua Wei

Tobias Trebeljahr

Lubos de Gerardo Surzin


Asku

Continentaldrift

Max4ever
on deviantart
4eyesphoto.com


Werol

RealityDream

00AngelicDevil00


Hougaard

Coccoluto

Nukeation


Stalkeron

Artofkerem

Keego51

DeanMcClelland

Wierdling

Zuzas

David Waters


Wayne Haag

Daniel Respaud

Industrial Light & Magic

Gary and Catherine

Artur Rosa


Juergen Eilts
I hope you enjoyed it. If so please give it a vote on Digg and share it with the others!
Tuesday, 21 December 2010
Create a Spectacular 3D Space Explosion
Concept
There are many different ways of creating space scenes and I’ll show you how do I usually do it. First of all, we should imagine how should the final image look like. In other words what we are going to create? My scene isn’t going to show anything special. There will be only some planets and a galaxy visible from top view in the background but obviously you can think of something different.

Creating Space Background
First let’s create a 1920×1200px Photoshop document and fill it with black with Paint Bucket Tool (G).
Background
Now let’s create another layer. Use your Brush Tool (B) with color set to dark blue (#172a3a in my case) and radius set to something between 300 and 1000 pixels to colorize your background. Use lighter blue (such as #162a3f or #27475f) to create some lighter areas at the bottom corners. When you are done I suggest to go to Filter -> Blur -> Gaussian Blur… and blur your layer a bit to make it look softer. For the radius type in 60px and it should be enough. At this point our background doesn’t look very interesting. We need to add some depth to it so I suggest to download any clouds image (I took stormy one from http://www.cgtextures.com/ website), paste it, set it to Overlay and decrease its opacity to 15%. If you don’t get anything similar to my background you can play with brightness and contrast (Image > Adjustments…) of your layer. Here’s what I got:
Setting Up Star Brush
It’s time to add some stars. Set your Brush Tool (B) to white color and use the following settings to create a new brush:
Painting Stars
Paint some stars on a different layers. Set them to Overlay and duplicate a few times by pressing Ctrl + J. You may also use a standard star brushes that comes with Photoshop or create some bigger ones somewhere. It’s a good idea to group each level of your stars as I did.
More Depth
Our background is already good for placing anything on it but I decided to add even more depth to it by placing dark galaxy at the center of my image and by darkening image corners a lot. You can download high resolution galaxy brushes made by thepixlpusher here: http://www.box.net/shared/hfqbplyosg. Choose one of the galaxies that is visible from top and paint it at the center of the image using black color. If necessary you can duplicate your layer to make the effect stronger. I’ve also created four more layers and placed there edges of the same galaxy to make corners of the image darker and more diversified. As for now we have a nice background to start with. It’s time for planets and other effects.
Planets
To create planets we can use any 3D application but I suggest to do it with Vue Infinite or Vue xStream. I’ve used Vue Infinite to do all the work because it has variety of presets that you can use and modify really quickly. The same effects can be achieved in 3ds Max or any other 3D application but Vue is created for rendering environments so it’s just a way easier. So, create a sphere and place it in front of your camera. Select both the camera and the sphere and in Side View grab the Z axis to move them up. After that rotate them counter clock wise until the camera doesn’t catch the ground.
Setting Up Atmosphere
Go Atmosphere -> Load Atmosphere… and choose Godrays that I found are great for this purpose. Select the last preset and find Atmosphere Editor under Atmosphere menu group and change the Lighting Model to Global radiosity which will make your renders a way better (well, not always better and that’s depending on your atmosphere – some of them are not conformed to be used with Global Radiosity – but it’s usually good to choose better lighting model anyway (at least I tend to choose GR often)).
Moving Sun
Afterwards move the sun a bit towards camera and back in the viewport because we want it to shine from the side of your render and not from behind the sphere.
Planet Materials
Click on the sphere and choose Get Material option from the menu to the right side of Vue Infinite. You can really choose anything from there or modify existing presets as you wish but I’ve first chosen clay material and then Chipped with Paths and both seem to work fine.
Setting Up Render
Render your scene with the setting shown below.
Rendering Planets
Here are my examples of planets:
Saving Renders
Save each render with its alpha map because we’ll want to cut it out of the background later.
Cutting These Things Out
Back to the Photoshop again. Open up one of your renders and paste its alpha map on a separate layer. Select white part of your alpha map with Magic Wand Tool (W) as shown below. After that select your planet layer and press Ctrl+J. This should cut your planet out of the render. Do the same with the other renders. Afterwards copy your planets and paste them into your main Photoshop document.
Asteroids
Your can create asteroids exactly the same way like you did with the planets but this time you should use rocks (you’ll find them in the left Vue’s sidebar) instead of spheres and obviously you should create some more of them. Place them as you wish. Below is my example. If you already render them follow previous steps to cut them and paste into main document.

Composition
Once you have all the necessary elements you can create a scene. I decided to simply place shiny star right next to the center of the galaxy and two planets on the opposite sides of the canvas. Maybe it’s not very imaginative but it was created for tutorial purposes only.Things to keep in mind:
- You should rotate pasted images if the light goes in the wrong direction.
- It’s hard to blend those renders with your background perfectly and probably the best way to do that is to adjust each of RGB channels separately and change the overall color to make it look that it belongs to this image but I decided to adjust background instead of planet colors. I made it darker there where it should blend with asteroids and planets. Also I’ve darkened some parts of planets to match the image.
Main Star
To create big star at the center simply create a new layer. Fill it with black color and go to Filter -> Render -> Lens Flare… Use 100% for Brightness, 105mm Prime. Hit Ctrl/CMD+T to scale down your newly created star. You can also erase edges of your rendered image with soft eraser to make it blend better. Set layer’s blend mode to Color Dodge and duplicate it if necessary to make effect stronger. Rays coming from the center were made by using brush created in the second step of this tutorial. Frist draw some dots. Make sure your dots are at the center of the image. Use radial blur by going to Filters -> Blur -> Radial Blur… with the Amount set to 25, Blur Method set to Zoom, Quality set to Best.
Placing planets and asteroids
Paste all the planets and asteroids into the main document. I’ve simply rotated the first planet and placed it in the top right corner. I’ve also resized the moon-like planet and placed it next to the first one. In the other side I’ve placed the second planet and some debris near it.Adjustments
If the planets don’t match the background you have to play with their brightness, contrast and color. I’ve selected everything that doesn’t match and made it darker using soft brush (paint on the new layer). Once you’ve painted some dark areas you will probably have to set your newly created layer(s) to Overlay, Soft Light or Color Dodge blend mode. You may also decrease layer’s opacity or duplicate the layer to make effect stronger. The area below was corrected by just placing black layer above asteroids layer with blend mode set to Overlay.
Space Explosion
The last thing is to add some fire and destroy a little part of one of the planets. First let’s make a selection using Lasso Tool (L) selecting the part of your planet that you want to get rid of. I suggest to make it a little bit jaggy. After that select a part of the area where you want to create your fire and go to Image -> Adjustments -> Variations…. You can play there with your fire as you like but I think you’ll only have to press “more red”, “more yellow” and “darker” a few times to make it look realistic. Select different parts of you planet and make it hotter. Once you are done you can use Smudge Tool, Dodge Tool, Burn Tool, Spoonge Tool or Sharpen Tool to adjust some parts of your explosion.
The hottest part of my planet is actually a third planet scaled down, with decreased size and variations applied. Just place it near the main planet and use your smudge tool to blend it if necessary although I didn’t do that because it seemed to be fine anyway. You may also want to duplicate this little asteroid and use motion blur on a duplicated layer. Make sure you’ve placed blurred layer below the main layer.

Conclusion
For the final image I’ve moved some elements in the better place and I’ve ended up with something like picture below. I hope you liked it and I hope this was useful for you. If so you can check my other tutorials or subscribe to an rss feed for more.
Monday, 13 December 2010
Particle Dispersion Effect Using 3DS Max and Particle Flow
Concept
There are lots of similar animations on the Internet but I couldn’t actually find a good tutorial that is explaining how to create effect like this so here you can find one. First let’s take a look at the final animation and a sample screenshot from the middle of the movie.

Usage
That’s what we are going to create but before we start I’d like to point out some possible methods of creating this effect that I’m familiar with and some situations where you may find it useful. Effects like this one are usually very basic stuff and at the same time they have a wide usage anytime when you want to:
- dissolve,
- explode,
- burn,
- destroy,
- hide,
- and more…
- using modifiers such as “delete mesh”
- using plug-ins like RayFire that are affecting object’s mesh
- using materials that are not affecting mesh but making object invisible.
Step 1 – Objects to disperse
Open up your Max and create some kind of an object. I chose teapot because it is more complex and has more details than other objects. It doesn’t really matter if it’s big or small. I used 40 centimeters for radius so I was playing with quite big teapot
 . Don’t forget that size does matter if you are going to render your scene. Some rendering engines works better if you keep real world dimensions.
Step 2 – Setting Up Particle Flow
Once you’ve done that turn on Particle View window. Usually it’s under 6 hotkey so you only have to hit 6 right after you’ve made teapot but if it doesn’t work go to Graph Editors -> Particle View in the top menu of your 3ds Max. Right click in the window that will appear and create Empty Flow (under Particle System section). Then create Birth right next to that and connect them together (find part of table that makes your mouse cursor like 3 arrows pointing to the center and drag and drop this part of your table on the top of another).

Step 3 – Modyfing Particle Flow
We have to modify a list of items by adding there some new objects. Right-click again and add Position Object, Force and Shape from a list.
- Position Object – because we want to add our teapot (or whatever you are using) to a system
- Force – because we want to add wind (otherwise particles won’t fly away)
- Shape – because we want to see particles on renders

Step 4
Go to Space Warps, choose Forces and then Wind. Place it somewhere on your scene. Again it can be either big or small as you wish because it doesn’t make any difference except it’s easier to find in viewports. I made it around 10 meters. Rotate and move it a bit so that it has direction in which you want your particles to fly. You can also make it falling ground but in this tutorial I’ll only cover flying.
Once you have your wind you can modify its setting. I found that standard wind’s strength is too high so it’s good idea to decrease it a little bit. Also you’ll probably want to add some turbulence to it so that it won’t go perfectly straight. Try to change other settings here if you won’t satisfied when we’ll be able to see the result (we can’t yet).

Step 5
Go back to Particle View and select Position Object. Add your teapot to Emitter Objects list.
Step 6
Now choose Force and obviously you have to add there your forces. In our case there is only wind.
Step 7
Go to Display and choose there your particles’ color as well as their type. I decided to make them look like a sand so I think Dots and yellowish color will be great.

Step 8
Now select Shape and decrease its size a lot like for example to 1cm or 2cm.Step 9
Go to the Birth and change Emit Stop to something bigger like 50 and Amount to something really high. I think 20,000 would be enough for now but for the final renders you’ll probably need to increase this number to around 100,000 (depending on how many particles you need). Finally we can close that and get back to viewports and our teapot. Animation is already there. Maybe values I chose are not good for you but always you can play with them as you like. Now it’s good time for that. If it slows down your computer don’t worry. You can go to your PE Source settings and look for Quantity Settings. Decrease Viewport % a bit and it will show less particles in your viewport but still they will be visible on your renders.
Step 10
We can get back to our teapot again. We want it to disappear and that can be done using gradient ramp as an opacity map. Opacity slot as many others works that way it grabs value from color of any grayscale map and make your objects more or less transparent. For instance, if you will put there black bitmap it will be invisible all the time because black has value of 0. Go to Material Editor (M) and select one of the material slots. Select opacity slot and then change it from NONE to Gradient Ramp.
Step 11
Basically what we want to achieve is animated material which will make teapot disappear while there are particles flying around. We need to animate gradient and make it change from white at the beginning to black at the end during 100 frames. It’s a bit complicated process. Try to even set key frames for already set indicators (colors)(for instance if indicator is already white set it white again anyway when you move it to another position). Turn the Set Key mode on and go to the 1st frame.- Frame: 1 – 1% indicator set to black and rest white at positions 2%, 3% and one at 100%
- Frame: 2 – 1% and 2% indicators set to black and rest white at positions like before (remember to change their color to the same color here even if they already have this color – this will make key frame)
- Frame: 98 – move indicators from 2% and 3% to accordingly 98% and 99% (1% indicator is black and 2% indicator is white all the time)
- Frame: 99 – 99% indicator set to black and rest black but 100% is still white
- Frame 100 – 100% indicator set to black and rest are black
A couple things to note:
- to see material’s key frames on your time line you have to add this material to teapot or other object first
- you will have to move key frames then because particles are starting to appear slowly and you want your teapot to disappear only when there is a lot of particles already and not right after animation starts.
Step 12
If we now render that at for example 50th frame it will be ok for some objects but not for teapot. You have to add some mapping to it. Modifier called UVW Map should work fine with standard settings but simple objects like teapot. Animation is ready. It looks almost or exactly like we wanted to but you can play with gradient a bit and make it softer or add there some noise to make effect better. I’ve set my noise amount to 0,08, size to 0,93 and mode to Fractal.

Conclusion
Well, that is all for now. I hope you enjoyed my tutorial. As I mentioned you can use this effect in variety of ways. Especially it is useful when you are going to burn something and want to burnt part of your object disappear, when you want to make an explosion and want your object to disappear consecutively part by part. It doesn’t require much calculating power as it is with modifying mesh and gives you quite good results.