Saturday, 15 January 2011
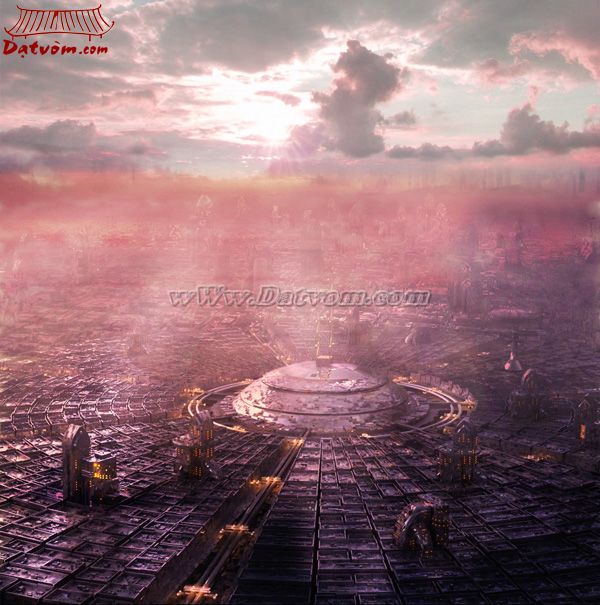
Create an Awesome 3D Future City – Day 2
Posted by Tien Dung | Saturday, 15 January 2011 | Category:
3D
|
IMPORTANT! This is a continuation of the previous part of this tutorial. If you haven’t read the previous part yet please visit Create an Awesome 3D Future City – Day 1 in order to complete it.
3D Future City
Again, that is what we are going to create.
City Composition
In the first part you’ve created all the necessary models so let’s arrange a city from them now. If you haven’t moved anything you should now have a cylinder with buildings placed at the position [0,0,0] and some little buildings that haven’t been placed anywhere yet. Place them as you like on top of the cylinder (see the final image). This is going to be our main city segment but we will also need a second less detailed part in the background. This is how it will look like.Background City
Create a plane that is 150 meters wide and 150 meters long. Use 24 for width and lenght segments and move it to the position like [-34.7m, 37.9m, 3.7m](that’s how I placed it). Basically we need to create some buildings there. You can follow along the first part of this tutorial and use Piotr’s techniques to create some random buildings or you can just apply a greeble modifier to the plane. The background city won’t be visible as clearly so nobody will notice what it is really made of (unless you are planning high resolution renders). I applied a Greeble twice to the entire plane. First Greeble makes some space between polygons (I set taper fairly high) and the second one creates a little buildings. Hide the plane for now.Camera Placement
Create a standard camera and use the following settings:- Lens: 43.455841mm
- FOV: 45.0 degrees
- X=15.472652m, Y=-73.240763m, Z=24.403214m
- Roll: 0.0
- Target placement is [-1.814419m, -1.235621m, 18.575125m]
- Target distance should be 74.280222m afterwards
- Go to render options and change the output size settings to: width=1280, Height=1500.
Future City Materials
Press “M” on your keyboard to open up a material editor. Create a new VrayMtl, change its Reflect color from black to dark grey. Now follow the screenshot below to set up the maps like I did. Also, put a VrayHDRI in the Environment slot. You can use here whatever HDR image you want but I guess the industrial one will be the best choice. This will be highly reflective texture to use on all the buildings and tectum.Sci-fi Textures
You can use textures that I created.Other Materials
Clone the previous material. We have to change some settings in order to create something less reflective for the streets and pipes.Mapping
Now we need to modify UV mapping. All you need to do is to add an UVW Mapping modifier to every object on the scene. Change mapping mode to Face. After that you can assign materials to objects.Lights
At this point add any missing elements to the scene to make it look like on the image below. I’ve used VRay lights everywhere and they basically are placed like on the image below. Try to play with different setting here and make some test renders to see how will it look like when you move them around. I’m leaving it up to you because most likely your placement will be good for further playing with it.Matte Painting
Finally, that’s how your render should look like in Adobe Photoshop (don’t forget to save its alpha channel as a separate image). Mask the edges and the bottom part because we won’t need them.City Extension
Hide the main cylinder and unhide the plane with the background city. Render it. After that paste it into the Photoshop and use your cylinder’s Alpha mask to get rid of the part of the background city in front of the camera.City Extension Adjustments
We don’t have an infinite city so it’s good to add some fog to hide this fact. Use Gradient tool to achieve it and set the layer’s blending mode to Screen.Background Buildings
Draw some skyscrapers there where your horizon is and copy them a few times. You don’t have to create anything detailed but better don’t follow mine. Think of something that looks more like a buildings insteadSky
To add a sky simply take a photo of one, render it or use a sky texture from the internet. I used one of the skies available on cgtextures.com. Paste it to your document and resize it if necessary. To fix the rest of the image paint something like on the images below on two different layers with brush. Set first layer to Overlay and the second to Multiply.Final Touches
Add two Brightness/Contrast Adjustment layers with the following settings.Conclusion
That is all for now! If you liked it please Stumble or Digg it! The next tutorials are coming in the next few days so subscribe to our RSS feed and don’t miss them!
Subscribe to:
Post Comments (Atom)
Currently have 0 comments: